Showing posts with label jewelry board. Show all posts

Thursday, April 2, 2009

Jewelry Board - Part 2

I hung the 2 jewelry boards yesterday. Loving them. Getting dressed this morning was fantastic, because so many accessories were right there for me to look at. I am keeping the sterling silver in the lined top drawer of my lingerie chest to help with the tarnish protection. But this has all my favorite pieces out where I can (hopefully) remember to wear them.


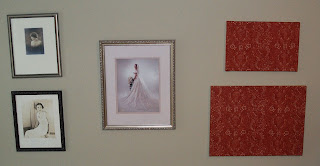
The pic to the left is my wedding portrait and the 2 to the left of that are both of my grandmothers.

I hung the 2 boards to the left of my lingerie chest, over a vanity stool that is usually full of stuff, but I cleaned it off just for you all!Here we have it loaded up.

And full wall effect.


Organization is always so satisfying, isn't it?

Monday, March 30, 2009

Today's Outfit and a Quick Peek at the Purchases

Like I said earlier, crazy-ish day - hubby out of town for the night, kids home from school (teacher work day - not that I'm complaining, they sure do need them!), and puppy to take care of. My biggest difficulty in getting dressed this morning was that (1) it was chilly - or at least really windy, and I really, really wanted to wear a turtleneck sweater, but (2) I *finally* got my grubby hands on a Merona Pearl Cluster necklace yesterday. Huge thanks to AnneG who posted on 3-Penny Princess' blog that she had picked some up. Yay!! Can't wait to see the necklace on my new jewelry boards, but yeah...haven't gotten to the hanging yet.

Anyway...chilly weather, but wanted to wear the pearls. Plus I was still really feeling the orange from yesterday, so I pulled out an orange BR sweater from Fall 2007, (a bit more red than what I could find on Polyvore) but I thought the shawl collar would show off my necklace nicely, even if the only people who saw it were the kiddies and the puppy. And shoes are different, but this was the closest I could find to 2 1/2-year-old Payless flats!

OOTD-03/30/09 - Merona Pearl Cluster Necklace
OOTD-03/30/09 - Merona Pearl Cluster Necklace - by HeidiGblog on Polyvore.com

Here are my quick peek at the purchases, hanging on the closet door, waiting for me to go through and make some final decisions:


And the Polyvore set (I wish the molten metallic shirt showed up better, because it's gorgeous):
3/29/09 Purchases
3/29/09 Purchases - by HeidiGblog on Polyvore.com


The only thing I couldn't find on Polyvore was the gray bangle bracelet, which I totally love and want to wear everytime I put on my gray patent flats. Like the gray bubble necklace with Joyce and ShopaholicDiva have, the bracelet has that mix of gold and medium gray that I love.


What do you think?
Sunday, March 29, 2009

Jewelry Board - Part 1

After reading and being inspired by FabulousFloridaMommy's post and Joyce's post, I decided to make my own fabric covered jewelry board to hang next to my lingerie chest for storing and displaying a good portion of my necklaces and bracelets. I wish I had space in my closet, but I don't, so therefore it has to look presentable. This is Part 1, since I actually made the bulletin board, but I haven't hung them yet, so that will be Part 2 (which may or may not include a new piece of jewelry from today's DC JCA outing).

Step 1 - Assemble your materials. Given the space on my wall, I decided to do 2 bulletin boards, 1 small (18 x 12) over 1 medium (24 x 18), both hung "landscape." My fabric is leftover from doing the bedroom - I love this print and wish I had used it in more than 1 little pillow. Given the colors, I don't know that I'll be hanging much in the way of brightly colored beads, but we'll see.

Materials = cork board, fabric to cover and wrap around, ribbon to glue around perimeter, thin cotton batting for cork surface, push pins, glue (I used a quick-dry, rock-solid-hold glue from Michaels), scissors, masking tape - and a towel to cover my work surface, which was the dining room floor, since the kids were doing Play Doh in the kitchen and snagged my "craft" vinyl tablecloth.

Step 2 - Cut a piece of cotton batting to cover the cork part on the front and then glue around edges just to help hold it. This will help the fabric look better at the edges of the frame.

Step 3 - Cut the fabric to hang over the edges by several inches and then center the fabric on the cork board, then flip over so you are looking at the back of both. You may want to trim the fabric again so that it just comes up over the backside of the frame. Remember that you will want to stretch it a bit when attaching so make sure you account for that.

Step 4 - Start gluing. Work on 2 opposing sides first, remembering to make sure fabric is pulled taut, not too tight, not too slack. Then do the other 2 sides. BTW, you could use a staple gun or hot glue gun if you wanted - this was just my choice for this project. Give the glue a chance to dry (I worked on the other board in the interim).

Step 5 - Glue your ribbon on the edge. Given the pattern and the fact that I was going to have jewelry hanging, I chose not to have any ribbon on the front surface. Depending on your situation, you may want to change that. Start at the bottom corner and glue about 3" to the corner and continue around. End at that same bottom corner. (shows less on the bottom)

Step 6 - Let glue dry again and hang. Yeah....I haven't gotten to that yet. But here they are sitting in the dining room drying. For you eagle eyes, yes they are upside down (because we glued the ribbon on the bottom last, weren't you reading?).

I am very excited to see how this works on the wall. I also think you could do this just for decoration on a wall with an amazing fabric. We have the DC JCA outing today so I may not get to the hanging part until tomorrow. As soon as they are up and going, I will post. Hope you all have a blessed and restful Sunday!